8.0 KiB
Using Cinemachine
Using Cinemachine requires a new way of thinking about working with cameras. For example, you might have invested heavily in carefully scripted camera behaviors. However, Cinemachine can give the same results, if not better, in less time.
Virtual Cameras
Cinemachine does not create new cameras. Instead, it directs a single Unity camera for multiple shots. You compose these shots with Virtual Cameras. Virtual Cameras move and rotate the Unity camera and control its settings.
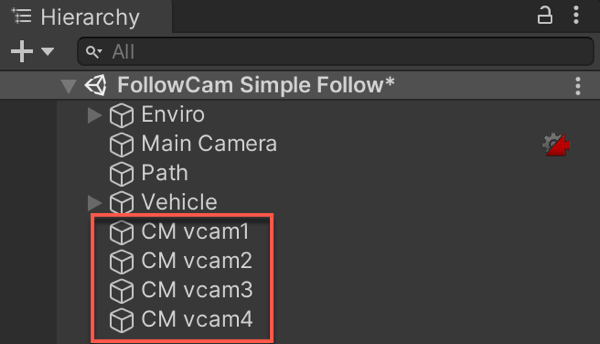
The Virtual Cameras are separate GameObjects from the Unity Camera, and behave independently. They are not nested within each other. For example, a Scene might look like this:
The main tasks that the Virtual Camera does for you:
- Positions the Unity camera in the Scene.
- Aims the Unity camera at something.
- Adds procedural noise to the Unity camera. Noise simulates things like handheld effects or vehicle shakes.
Cinemachine encourages you to create many Virtual Cameras. The Virtual Camera is designed to consume little processing power. If your Scene is performance-sensitive, deactivate all but the essential Virtual Cameras at any given moment for best performance.
It is recommended that you use a single Virtual Camera for a single shot. Take advantage of this to create dramatic or subtle cuts or blends. Examples:
-
For a cutscene where two characters exchange dialog, use three Virtual Cameras: one camera for a mid-shot of both characters, and separate Virtual Cameras for a close-up of each character. Use Timeline to synchronize audio with the Virtual Cameras.
-
Duplicate an existing Virtual Camera so that both Virtual Cameras are in the same position in the Scene. For the second Virtual Camera, change the FOV or composition. When a player enters a trigger volume, Cinemachine blends from the first to the second Virtual Camera to emphasize a change in action.
One Virtual Camera has control of the Unity camera at any point in time. This is the live Virtual Camera. The exception to this rule is when a blend occurs from one Virtual Camera to the next. During the blend, both Virtual Cameras are live.
Cinemachine Brain
The Cinemachine Brain is a component in the Unity Camera itself. The Cinemachine Brain monitors all active Virtual Cameras in the Scene. To specify the next live Virtual Camera, you activate or deactivate the desired Virtual Camera's game object. Cinemachine Brain then chooses the most recently activated Virtual Camera with the same or higher priority as the live Virtual Camera. It performs a cut or blend between the previous and new Virtual Cameras.
Tip: Use Cinemachine Brain to respond to dynamic game events in real time. It allows your game logic to control the camera by manipulating priorities. This is particularly useful for live gameplay, where action isn’t always predictable. Use Timeline to choreograph cameras in predictable situations, like cutscenes. Timeline overrides the Cinemachine Brain priority system to give you precise, to-the-frame camera control.
Moving and aiming
Use the Body properties in a Virtual Camera to specify how to move it in the Scene. Use the Aim properties to specify how to rotate it.
A Virtual Camera has two targets:
- The Follow target specifies a GameObject for the Virtual Camera to move with.
- The Look At target specifies the GameObject to aim at.
Cinemachine includes a variety of procedural algorithms to control moving and aiming. Each algorithm solves a specific problem, and has properties to customize the algorithm for your specific needs. Cinemachine implements these algorithms as CinemachineComponent objects. Use the CinemachineComponent class to implement a custom moving or aiming behavior.
The Body properties offer the following procedural algorithms for moving the Virtual Camera in a Scene:
- Transposer: Move in a fixed relationship to the Follow target, with optional damping.
- Do Nothing: Do not move the Virtual Camera.
- Framing Transposer: Move in a fixed screen-space relationship to the Follow target, with optional damping.
- Orbital Transposer: Move in a variable relationship to the Follow target, optionally accepting player input.
- Tracked Dolly: Move along a predefined path.
- Hard Lock to Target: Use the same position at the Follow target.
The Aim properties offer the following procedural algorithms for rotating a Virtual Camera to face the Look At target:
- Composer: Keep the Look At target in the camera frame, with compositional constraints.
- Group Composer: Keep multiple Look At targets in the camera frame.
- Do Nothing: Do not rotate the Virtual Camera.
- POV: Rotate the Virtual Camera based on the user’s input.
- Same As Follow Target: Set the camera’s rotation to the rotation of the Follow target.
- Hard Look At: Keep the Look At target in the center of the camera frame.
Composing a shot
The Framing Transposer, Composer, and Group Composer algorithms define areas in the camera frame for you to compose a shot:
-
Dead zone: The area of the frame that Cinemachine keeps the target in.
-
Soft zone: If the target enters this region of the frame, the camera will re-orient to put it back in the dead zone. It will do this slowly or quickly, according to the time specified in the Damping settings.
-
Screen: The screen position of the center of the dead zone. 0.5 is the center of the screen.
-
Damping: Simulates the lag that a real camera operator introduces while operating a heavy physical camera. Damping specifies quickly or slowly the camera reacts when the target enters the soft zone while the camera tracks the target. Use small numbers to simulate a more responsive camera, rapidly moving or aiming the camera to keep the target in the dead zone. Larger numbers simulate heavier cameras, The larger the value, the more Cinemachine allows the target to enter the soft zone.
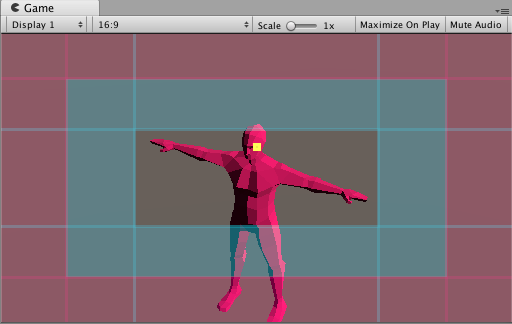
The Game Window Guides gives an interactive, visual indication of these areas. The guides appear as tinted areas in the Game view.
The clear area indicates the dead zone. The blue-tinted area indicates the soft zone. The position of the soft and dead zones indicates the screen position. The red-tinted area indicates the no pass area, which the target never enters. The yellow square indicates the target.
Adjust these areas to get a wide range of camera behaviors. To do this, drag their edges in the Game view or edit their properties in the Inspector window. For example, use larger damping values to simulate a larger, heavier camera, or enlarge the soft zone and dead zone to create an area in the middle of the camera frame that is immune to target motion. Use this feature for things like animation cycles, where you don’t want the camera to track the target if it moves just a little.
Using noise to simulate camera shake
Real-world physical cameras are often heavy and cumbersome. They are hand-held by the camera operator or mounted on unstable objects like moving vehicles. Use Noise properties to simulate these real-world qualities for cinematic effect. For example, you could add a camera shake when following a running character to immerse the player in the action.
At each frame update, Cinemachine adds noise separately from the movement of the camera to follow a target. Noise does not influence the camera’s position in future frames. This separation ensures that properties like damping behave as expected.

