5.7 KiB
Blackboard
Description
You can use the Blackboard to define, order, and categorize the Properties and Keywords in a graph. From the Blackboard, you can also edit the path for the selected Shader Graph Asset or Sub Graph.
Accessing the Blackboard
The Blackboard is visible by default, and you cannot drag it off the graph and lose it. However, you are able to position it anywhere in the Shader Graph Window. It always maintains the same distance from the nearest corner, even if you resize the window.
Adding properties and keywords to the Blackboard
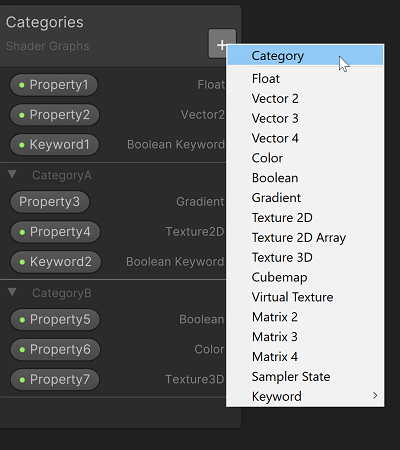
To create a new property or keyword, click the Add (+) button on the Blackboard's title bar and select a type. For a full list of property types, see Property Types.
Editing properties and keywords
Select a property or keyword in the Blackboard or graph to modify its settings in the Node Settings Menu.
| Setting | Description |
|---|---|
| Name | The property's display name. The Editor strips quotation marks from display names and replaces them with underscores. Rename an item via the Blackboard by double-clicking on its name. |
| Reference | The name that Shader Graph uses internally for this property. Although the Editor populates this value by default, you can modify it. To revert to the original reference name, right-click on the word Reference (not the entry field) and select Reset Reference in the context menu. If the Reference Name contains any characters that HLSL does not support, the Editor replaces those characters with underscores. |
| Default | The default value of this property in any Material based on this Shader Graph. For example, if you have a Shader Graph for grass and expose the grass color as a property, you might set the default to Green. |
| Precision | Set the precision mode for the property. See Precision Modes. |
| Exposed | Enable this setting to make the property available for you to edit via the C# API. Enabled by default. |
Modifying and selecting keywords and properties
- To reorder items listed on the Blackboard, drag and drop them.
- To delete items, use the Delete key on Windows or Command + Backspace keys on macOS.
- To select multiple items, hold down the Ctrl key while making your selections.
- To cancel the selection of one or multiple items, hold down the Ctrl key while clicking on the items you want to remove from the selection.
Using Blackboard categories
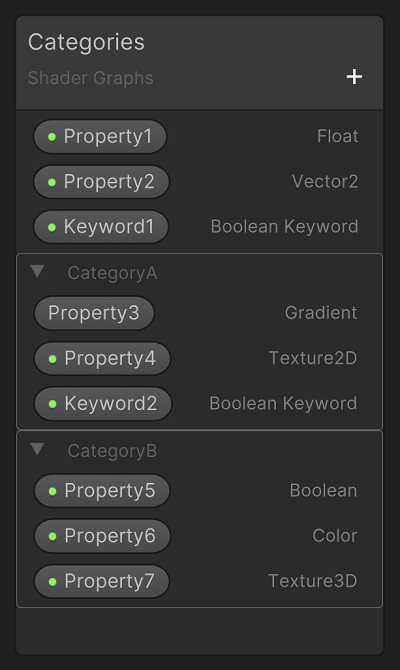
To make the properties in your shader more discoverable, organize them into categories. Expand and collapse categories to make the Blackboard easier to navigate.
Creating, renaming, moving, and deleting categories
- To add a category, use + on the Blackboard.
- To rename a category, double-click on the category name, or right-click and select Rename.
- To move a category within the Blackboard, select and drag it.
- To remove a category, select it and press Delete, or right-click and select Delete. Deleting a category also deletes the properties within it, so move those you wish to keep.
Adding, removing, and reordering properties and keywords
- To add a property or keyword to a category, expand the category with the foldout (⌄) symbol, then drag and drop the property or keyword onto the expanded category.
- To remove a property or keyword, select it and press Delete, or right-click and select Delete.
- To re-order properties or keywords, drag and drop them within a category or move them into other categories.
Creating a category for specific properties and keywords
Select multiple properties or keywords and use + on the Blackboard to create a category that contains all of the items you have selected.
Copying and pasting categories, with or without properties
You can paste empty categories, categories with all of their properties, and categories with some of their properties into one or more graphs. To copy a category with all of its properties:
- Select the property.
- Copy it with Ctrl+C.
- Paste it into your target graph with Ctrl+V.
To copy a specific set of properties:
- Select the category.
- Hold down the Ctrl key.
- Click the properties you do not want to include to remove them from the selection.
- Copy the property with Ctrl+C.
- Paste it into your target graph with Ctrl+V.
Using categories in the Material Inspector
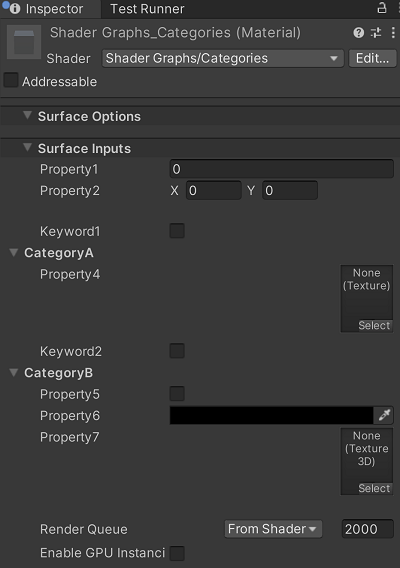
To modify a material you have created with a Shader Graph, you can adjust specific property or keyword values in the Material Inspector, or edit the graph itself.
Working with Streaming Virtual Textures
Streaming Virtual Texture Properties sample texture layers. To access these layers in the Material Inspector, expand the relevant Virtual Texture section with the ⌄ symbol next to its name. You can add and remove layers via the Inspector.
Exposing properties and keywords
Unity exposes properties and keywords by default. This enables write access from scripts, so that you can edit them via the C# API, in addition to the graph. Exposed items have a green dot in their label. Enable or disable this feature in the Node Settings menu.
Creating nodes
Drag a property or keyword from the Blackboard into the graph to create a node of that kind. Settings for a node in the graph are identical to those for the related property or keyword in the Blackboard. Expand these nodes to use a sub-member of the property value. Property node names include a green dot if the property is exposed.


