17 KiB
How to create a custom Renderer Feature
This section describes how to create a custom Renderer Feature for a URP Renderer.
This section assumes the following:
- The Scriptable Render Pipeline Settings property refers to a URP asset (Project Settings > Graphics > Scriptable Render Pipeline Settings).
This article contains the following sections:
Create example Scene and GameObjects
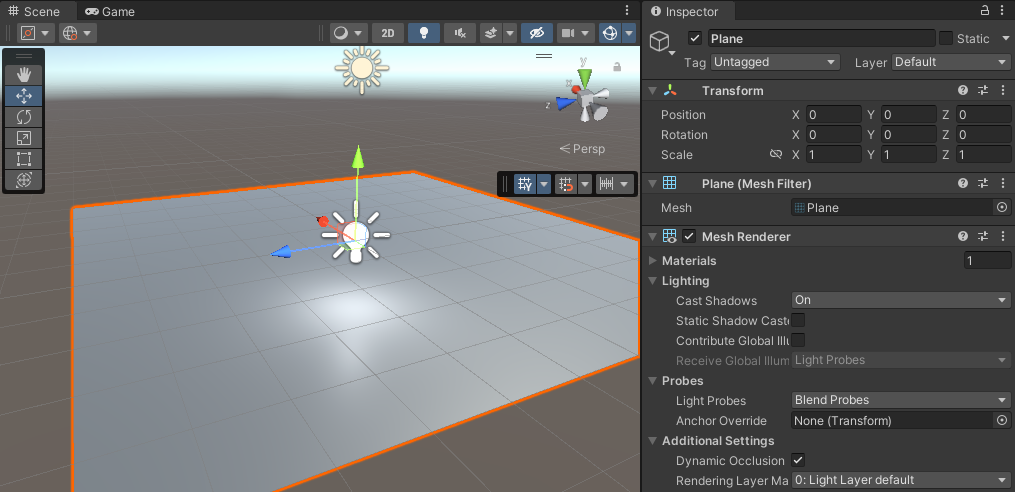
To follow the steps in this section, create a new Scene with the following GameObjects:
-
Create a plane.
-
Create a new Material and assign it the
Universal Render Pipeline/Litshader. Set the base color to grey (for example,#6A6A6A). Call the MaterialPlane. -
Create a Point Light and place it above the plane.
Your Scene should look like the following illustration:
Create a scriptable Renderer Feature and add it to the Universal Renderer
This part shows how to create a scriptable Renderer Feature and implement the methods that let you configure and inject ScriptableRenderPass instances into the scriptable Renderer.
-
Create a new C# script. Call the script
LensFlareRendererFeature.cs. -
Open the script, remove all the code from the
LensFlareRendererFeatureclass that Unity created. Add the followingusingdirective.using UnityEngine.Rendering.Universal; -
The
LensFlareRendererFeatureclass must inherit from theScriptableRendererFeatureclass.public class LensFlareRendererFeature : ScriptableRendererFeature -
The class must implement the following methods:
-
Create: Unity calls this method on the following events:-
When the Renderer Feature loads the first time.
-
When you enable or disable the Renderer Feature.
-
When you change a property in the inspector of the Renderer Feature.
-
-
AddRenderPasses: Unity calls this method every frame, once for each Camera. This method lets you injectScriptableRenderPassinstances into the scriptable Renderer.
-
Now you have the custom LensFlareRendererFeature Renderer Feature with its main methods.
Below is the complete code for this part.
using UnityEngine;
using UnityEngine.Rendering;
using UnityEngine.Rendering.Universal;

public class LensFlareRendererFeature : ScriptableRendererFeature
{
    public override void Create()
    { }

    public override void AddRenderPasses(ScriptableRenderer renderer,
    ref RenderingData renderingData)
    { }
}
Add the Renderer Feature you created to the the Universal Renderer asset. Follow this link to read how to add a Renderer Feature to a Renderer.
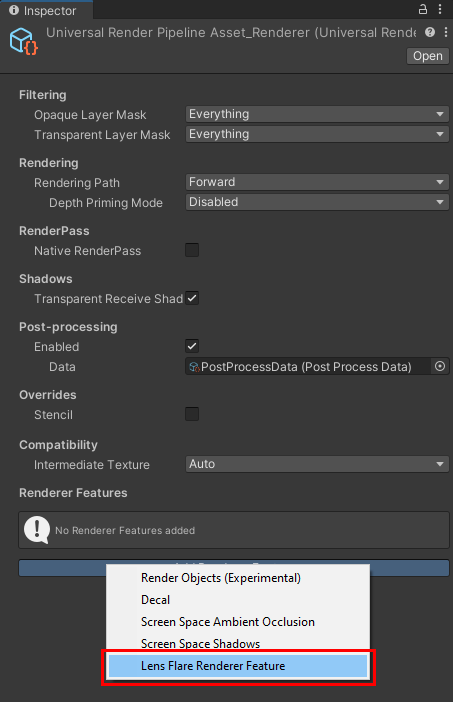
Add the Lens Flare Renderer Feature to the Universal Renderer.
Create and enqueue the scriptable Render Pass
This part shows how to create a scriptable Render Pass and and enqueue its instance into the scriptable Renderer.
-
In the
LensFlareRendererFeatureclass, declare theLensFlarePassclass that inherits fromScriptableRenderPass.class LensFlarePass : ScriptableRenderPass { } -
In
LensFlarePass, add theExecutemethod.Unity runs the
Executemethod every frame. In this method, you can implement your custom rendering functionality.public override void Execute(ScriptableRenderContext context, ref RenderingData renderingData) { } -
In the
LensFlareRendererFeatureclass, declare a privateLensFlarePassfield.private LensFlarePass _lensFlarePass; -
In the
Createmethod, instantiate the_lensFlarePassobject:_lensFlarePass = new LensFlarePass(FlareSettings); -
In the
AddRenderPassesmethod, use theEnqueuePassmethod of therendererobject to enqueue_lensFlarePassin the rendering queue.renderer.EnqueuePass(_lensFlarePass);
Now your custom LensFlareRendererFeature Renderer Feature is executing the Execute method inside the custom LensFlarePass pass.
Below is the complete code for this part.
using UnityEngine;
using UnityEngine.Rendering;
using UnityEngine.Rendering.Universal;

public class LensFlareRendererFeature : ScriptableRendererFeature
{
    class LensFlarePass : ScriptableRenderPass
    {
        public override void Execute(ScriptableRenderContext context, ref RenderingData renderingData)
        {
            Debug.Log(message: "The Execute() method runs.");
        }
    }

    private LensFlarePass _lensFlarePass;

    public override void Create()
    {
        _lensFlarePass = new LensFlarePass();
    }

    public override void AddRenderPasses(ScriptableRenderer renderer, ref RenderingData renderingData)
    {
        renderer.EnqueuePass(_lensFlarePass);
    }
}
Implement rendering commands in the Execute method
This part shows how to implement custom logic in the Execute method.
-
Create a CommandBuffer type object. This object holds the list of rendering commands to execute.
In the
Executemethod, add the following line:CommandBuffer cmd = CommandBufferPool.Get(name: "LensFlarePass");The method
CommandBufferPool.Get(name: "LensFlarePass")gets the new command buffer and assigns a name to it. -
Add the line that executes the command buffer and the line that releases it.
In the
Executemethod, add the following lines after the command buffer declaration:context.ExecuteCommandBuffer(cmd); CommandBufferPool.Release(cmd);Now the boilerplate part is ready and we can proceed to implementing the custom rendering logic.
The following steps implement the custom rendering logic.
In this example, the Renderer Feature draws lens flares as a texture on a Quad. The implementation requires a Material and a mesh (Quad).
-
In the
LensFlarePassclass, declare two private fields:MaterialandMesh:private Material _material; private Mesh _mesh;Then declare the constructor that takes those variables as arguments:
public LensFlarePass(Material material, Mesh mesh) { _material = material; _mesh = mesh; } -
Now the
LensFlarePassclass expects two arguments. To initialize the class with the arguments, add the following public fields in theLensFlareRendererFeatureclass:public Material material; public Mesh mesh;And add the arguments to the
LensFlarePassdeclaration in theCreatemethod:_lensFlarePass = new LensFlarePass(material, mesh); -
In the
Executemethod, use theDrawMeshmethod of thecmdobject. The method takes the_materialand the_meshfields as arguments. Add the following line between thecmdobject declaration and the commandcontext.ExecuteCommandBuffer(cmd).cmd.DrawMesh(_mesh, Matrix4x4.identity, _material);To ensure that Unity does call the
DrawMeshmethod withnullarguments, in theAddRenderPassesmethod, wrap theEnqueuePasscall in the null check condition:if (material != null && mesh != null) { renderer.EnqueuePass(_lensFlarePass); }
Now the LensFlarePass class has the following basic logic in the Execute method:
-
Get the new command buffer and assign it the name
LensFlarePass. -
Add rendering commands.
-
Execute the command buffer.
-
Release the buffer.
NOTE: Unity does not enqueue the
LensFlarePasspass yet, because theMaterialand theMeshproperties are null.
Below is the complete code for this part.
using UnityEngine;
using UnityEngine.Rendering;
using UnityEngine.Rendering.Universal;
public class LensFlareRendererFeature : ScriptableRendererFeature
{
class LensFlarePass : ScriptableRenderPass
{
private Material _material;
private Mesh _mesh;
public LensFlarePass(Material material, Mesh mesh)
{
_material = material;
_mesh = mesh;
}
public override void Execute(ScriptableRenderContext context,
ref RenderingData renderingData)
{
CommandBuffer cmd = CommandBufferPool.Get(name: "LensFlarePass");
cmd.DrawMesh(_mesh, Matrix4x4.identity, _material);
context.ExecuteCommandBuffer(cmd);
CommandBufferPool.Release(cmd);
}
}
private LensFlarePass _lensFlarePass;
public Material material;
public Mesh mesh;
public override void Create()
{
_lensFlarePass = new LensFlarePass(material, mesh);
}
public override void AddRenderPasses(ScriptableRenderer renderer,
ref RenderingData renderingData)
{
if (material != null && mesh != null)
{
renderer.EnqueuePass(_lensFlarePass);
}
}
}
Implement the example-specific Material and rendering code
This section shows how to create a Material for the lens flare effect and how to implement the code to render flares at the positions of Lights.
-
Create a new Material, and assign it the
Universal Render Pipeline/Unlitshader. Call the MaterialLensFlare. -
For demonstration purpose, change the base color of the Material to red.
-
In the Universal Renderer, in
Lens Flare Renderer Feature, select theLensFlareMaterial in the Material property, and theQuadmesh in the Mesh property.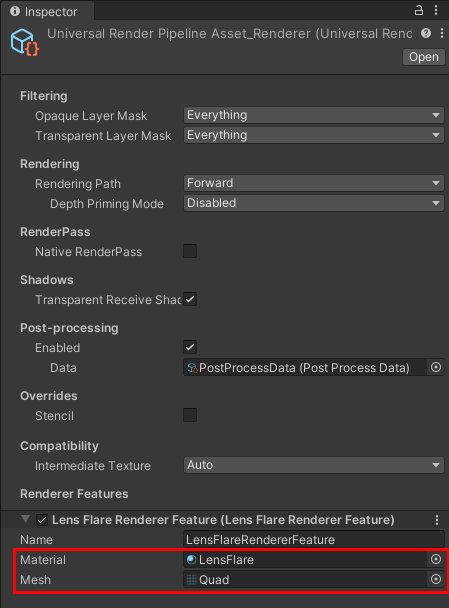
-
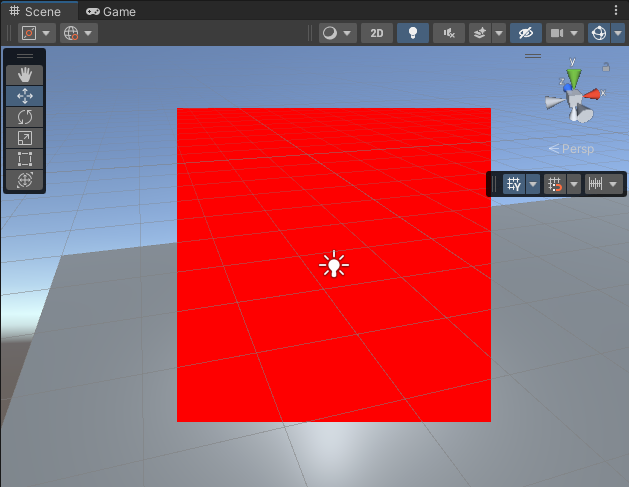
The Renderer Feature draws the quad in the Scene, but at this point it's just black. This is because the
Universal Render Pipeline/Unlitshader has multiple passes, and one of them paints the quad black. To change this behavior, use thecmd.DrawMeshmethod overload that accepts theshaderPassargument, and specify shader pass 0:cmd.DrawMesh(_mesh, Matrix4x4.identity, _material, 0, 0);
The following steps show the changes that are specific to the effect implementation in this example. They are for illustrative purposes.
-
Add the following lines in the
Executemethod. Place them after thecmdobject declaration. These lines ensure that Unity draws the quad with the flare in the following way:- In the screen space.
- With the correct aspect ratio.
- For each Light, in the center of the Light.
// Get the Camera data from the renderingData argument. Camera camera = renderingData.cameraData.camera; // Set the projection matrix so that Unity draws the quad in screen space cmd.SetViewProjectionMatrices(Matrix4x4.identity, Matrix4x4.identity); // Add the scale variable, use the Camera aspect ratio for the y coordinate Vector3 scale = new Vector3(1, camera.aspect, 1); // Draw a quad for each Light, at the screen space position of the Light. foreach (VisibleLight visibleLight in renderingData.lightData.visibleLights) { Light light = visibleLight.light; // Convert the position of each Light from world to viewport point. Vector3 position = camera.WorldToViewportPoint(light.transform.position) * 2 - Vector3.one; // Set the z coordinate of the quads to 0 so that Uniy draws them on the same plane. position.z = 0; // Change the Matrix4x4 argument in the cmd.DrawMesh method to use the position and // the scale variables. cmd.DrawMesh(_mesh, Matrix4x4.TRS(position, Quaternion.identity, scale), _material, 0, 0); }Now Unity draws a quad in the center of each Light.
-
To visualize the lens flare, make the following changes to the
LensFlareMaterial.Add the following texture to the base map:

Set the color to white.
Set
Surface TypetoTransparent.Set
Blending ModetoAdditive.
Now Unity draws the lens flare texture on the quad, but a part of the flare is not visible:
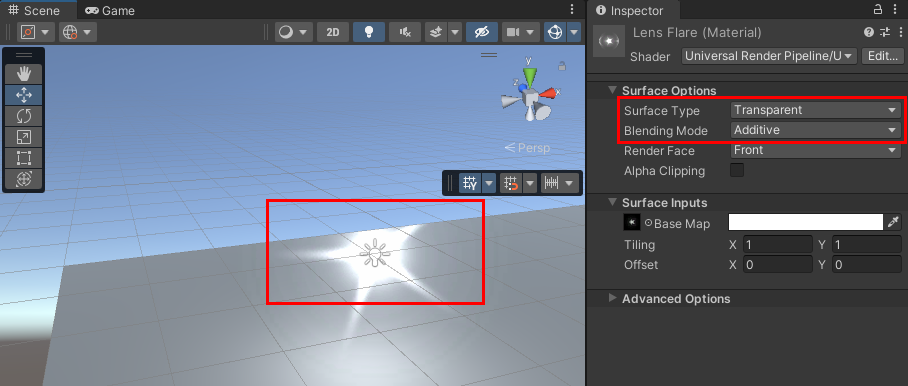
This is because Unity draws the skybox after the LensFlarePass render pass.
Change the order of the render passes
To see the order in which Unity draws the render passes, open the Frame Debugger (Window > Analysis > Frame Debugger).
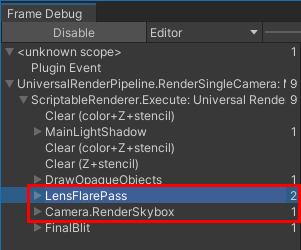
To enqueue the LensFlarePass pass after the skybox pass, use the renderPassEvent property of LensFlarePass. Assign the property the AfterRenderingSkybox event from the RenderPassEvent enum.
Make the following changes in the Create method:
public override void Create()
{
_lensFlarePass = new LensFlarePass(material, mesh);
// Draw the lens flare effect after the skybox.
_lensFlarePass.renderPassEvent = RenderPassEvent.AfterRenderingSkybox;
}
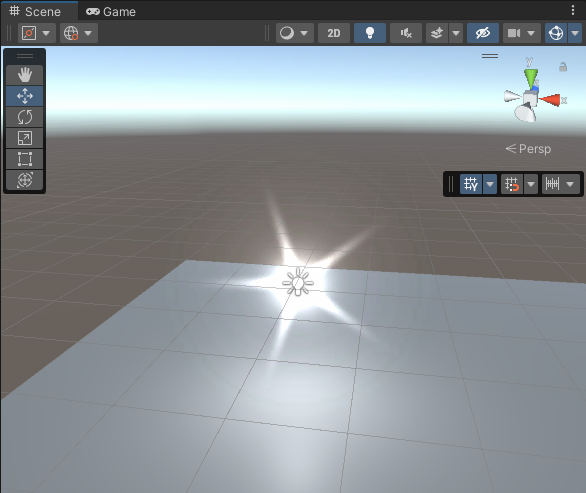
Now Unity draws the lens flare on top of the skybox.
Complete code for this example
Below is the complete code for this example.
using UnityEngine;
using UnityEngine.Rendering;
using UnityEngine.Rendering.Universal;
public class LensFlareRendererFeature : ScriptableRendererFeature
{
class LensFlarePass : ScriptableRenderPass
{
private Material _material;
private Mesh _mesh;
public LensFlarePass(Material material, Mesh mesh)
{
    _material = material;
    _mesh = mesh;
}
public override void Execute(ScriptableRenderContext context,
ref RenderingData renderingData)
{
CommandBuffer cmd = CommandBufferPool.Get(name: "LensFlarePass");
// Get the Camera data from the renderingData argument.
Camera camera = renderingData.cameraData.camera;
// Set the projection matrix so that Unity draws the quad in screen space.
cmd.SetViewProjectionMatrices(Matrix4x4.identity, Matrix4x4.identity);
// Add the scale variable, use the Camera aspect ratio for the y coordinate
Vector3 scale = new Vector3(1, camera.aspect, 1);
// Draw a quad for each Light, at the screen space position of the Light.
foreach (VisibleLight visibleLight in renderingData.lightData.visibleLights)
{
Light light = visibleLight.light;
// Convert the position of each Light from world to viewport point.
Vector3 position =
camera.WorldToViewportPoint(light.transform.position) * 2 - Vector3.one;
// Set the z coordinate of the quads to 0 so that Uniy draws them on the same
// plane.
position.z = 0;
// Change the Matrix4x4 argument in the cmd.DrawMesh method to use
// the position and the scale variables.
cmd.DrawMesh(_mesh, Matrix4x4.TRS(position, Quaternion.identity, scale),
_material, 0, 0);
}
context.ExecuteCommandBuffer(cmd);
CommandBufferPool.Release(cmd);
}
}
private LensFlarePass _lensFlarePass;
public Material material;
public Mesh mesh;
public override void Create()
{
_lensFlarePass = new LensFlarePass(material, mesh);
// Draw the lens flare effect after the skybox.
_lensFlarePass.renderPassEvent = RenderPassEvent.AfterRenderingSkybox;
}
public override void AddRenderPasses(ScriptableRenderer renderer, ref RenderingData renderingData)
{
if (material != null && mesh != null)
{
    renderer.EnqueuePass(_lensFlarePass);
}
}
}