# Cinemachine Impulse Sources
An Impulse Source is a component that emits a vibration signal from a point in Scene space. Game events can cause an Impulse Source to emit a signal from the place where the event occurs. The event _triggers_ impulses, and the source _generates_ impulses. Virtual cameras with an Impulse Listener extension _react_ to impulses by shaking.
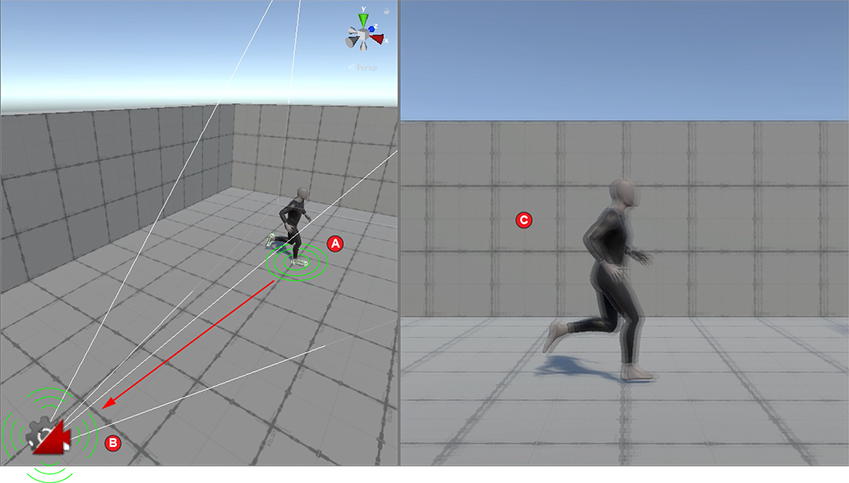
In the image below, the figure's feet are Impulse Sources. When they collide with the floor (A) they generate impulses. The camera is an Impulse Listener and reacts to the impulses by shaking (B), which shakes the resulting image in the game view (C).

Cinemachine ships with two types of Impulse Source component.
- **[Cinemachine Collision Impulse Source](CinemachineCollisionImpulseSource.md)** generates impulses in reaction to collisions and trigger zones.
- **[Cinemachine Impulse Source](CinemachineImpulseSource.md)** generates impulses in reaction to events other than collisions.
Your Scene can have as many Impulse Sources as you want. Here are a few examples of where you might use Impulse Source components in a Scene:
- On each of a giant’s feet, so that the ground shakes when the giant walks.
- On a projectile that explodes when it hits a target.
- On the surface of a gelatin planet that wobbles when something touches it.
By default, an Impulse Source affects every [Impulse Listener](CinemachineImpulseListener.md) in range, but you can apply [channel filtering](CinemachineImpulseFiltering.md#ChannelFiltering) to make Sources affect some Listeners and not others.
## Key Impulse Source properties
While the raw vibration signal defines the basic “shape” of the camera shake, the Impulse Source controls several other important properties that define the impulses it generates.
Understanding some of these properties in detail can help you create more realistic camera shake setups.
Below you'll find detailed descriptions of the following key properties:
- **[Amplitude](#Amplitude):** controls the strength of the vibration.
- **[Orientation and direction](#Orientation):** Impulse can transform the signal so that the vibrations are consistent with the direction of the impact that produces them.
- **[Time envelope](#TimeEnvelope):** controls the signal’s attack, sustain, and decay so that the signal fades in and out to the appropriate intensity and has a finite duration.
- **[Spatial range](#SpatialRange):** controls how far the signal travels in the Scene before it fades out completely
For descriptions of all Impulse Source properties, as well as instructions for adding Impulse Sources to your scene, see documentation on the [Impulse Source](CinemachineImpulseSource.md) and [Collision Impulse Source](CinemachineCollisionImpulseSource.md) components.
### Amplitude
The amplitude of the raw impulse signal controls the strength of the vibration for each impact. There are two ways to adjust the amplitude for a given Impulse Source.
The **Amplitude Gain** property amplifies or attenuates the raw impulse signal. It affects all impacts, all the time. Think of it as a global “volume” setting for turning the strength of an Impulse Source’s vibrations up or down.
Changing the magnitude of the **Velocity** vector when generating the signal also scales the signal amplitude, but the effect is per-impact rather than global. By adjusting the velocity of individual Impulse events, you can set things up so that light impacts make smaller vibrations, and heavy impacts make bigger ones.
- For the **Cinemachine Impulse Source** component you must set the velocity vector yourself via a script. The signal’s amplitude scales by the magnitude of this vector.
- The **Cinemachine Collision Impulse Source** component calculates the velocity vector automatically according to rules defined by the three properties in the **[How To Generate The Impulse](CinemachineCollisionImpulseSource.md#GenerateImpulse)** section.
These global and per-impact adjustments are multiplied to calculate the actual amplitude of each impact.
### Orientation and Direction
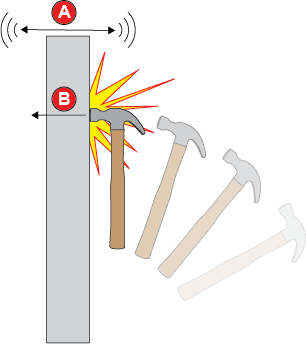
To create realistic vibrations, an impulse signal should be strongest along the axis of impact, and its amplitude (or strength) should be proportional to the force of the impact. For example, if you strike a wall with a hammer, the wall vibrates primarily along the axis of the hammer’s path. For the hammer’s impulse signal to be realistic, it should have the most vibration along that axis.
In the image below, the main axis for vibration (A) matches the direction the hammer is traveling when it hits the wall (B).

Rather than requiring separate signal definitions for every possible impact direction and strength, Impulse uses the concept of a “local space” for defining the raw signal. You can rotate and scale the raw signal in its local space to produce a “final” signal that matches the actual impact.
Impulse assumes that the main direction for an impact is “down,” so as a general rule, your signals should put more vibration along the Y axis (the 6D shake noise preset does this). You can then rely on local-space rotation and scaling to produce the correct vibrations for each impact occurrence.
#### Controlling orientation and direction
The **Cinemachine Impulse Source** and **Cinemachine Collision Impulse Source** components have properties that control the orientation of the raw signal. Use these properties to mimic real-world vibration.
- For the **Cinemachine Impulse Source** component, the [GenerateImpulse()](../api/Cinemachine.CinemachineImpulseSource.md#Cinemachine_CinemachineImpulseSource_GenerateImpulse_) method takes a velocity vector as a parameter. This vector defines the direction and strength of the impact. The Impulse system uses this to calculate the final signal based on the Raw signal definition, rotating and scaling it appropriately.
- For the **Cinemachine Collision Impulse Source** component, the velocity vector is generated automatically based on the directions and masses of the GameObjects involved.
To control how this is done, use the properties in the **[How To Generate The Impulse](CinemachineCollisionImpulseSource.md#GenerateImpulse)** section of the Inspector window. The **Use Impact Direction** property controls whether the signal is rotated to correspond to the impact direction.
#### Direction mode
The **[Spatial Range](CinemachineImpulseSource.md#SpatialRange) > Direction Mode** property allows you to add a subtle tweak to the signal orientation. When you set it to **Rotate Towards Source**, the impulse signal is further rotated so that vibrations point a little more prominently in the direction of the Impulse Source.
The effect isn’t noticeable for radially symmetric vibrations, but for signals that emphasize a direction, like 6D shake, it gives a subconscious indication of where the vibration is coming from. This can be quite effective when you generate impacts in multiple locations and you don't want them to all feel the same.
The default **Direction Mode** setting of **Fixed** turns the effect off.
### Time envelope
Vibrations from a real-world impact get stronger until they reach their peak strength, then weaken until the vibration stops. How long this cycle takes depends on the strength of the impact, and the characteristics of the GameObjects involved.
For instance, striking a concrete wall with a hammer produces a short, sharp impact. The vibrations reach their peak strength almost instantly and stop almost instantly. Striking a large sheet of thin metal, on the other hand, produces sustained vibration, which starts suddenly, stays at peak intensity for a while, and gradually softens.
Use an Impulse Source’s **[Time Envelope](CinemachineImpulseSource.md#TimeEnvelope)** properties to control this cycle when impacts in the Scene shake the camera. The time envelope has three properties:
- **Attack** controls the Impulse signal’s transition to peak intensity.
- **Sustain Time** specifies how long the signal stays at peak intensity.
- **Decay** controls the signal’s transition from peak intensity to zero.
Both **Attack** and **Decay** consist of a duration value that specifies how long the transition takes, and a curve that defines how it happens (for example, whether it happens gradually or suddenly). The curves are optional; if you leave them blank in the Inspector window, Impulse uses its default curves, which are suitable for most purposes. **Sustain Time** is a duration value only.
Taken together, these properties control how long vibrations from an impact occurrence last, and how they fade in and fade out. However, they don’t account for the strength of the impact. To do that, enable the **Scale with Impact** property. When it’s enabled, the time envelope scales according the strength of an impact. Stronger impacts make the envelope longer, and weaker ones make it shorter. This does not affect the envelope’s proportions.
### Spatial Range
An Impulse Source’s **[Spatial Range](CinemachineImpulseSource.md#SpatialRange)** properties define the zone in the Scene that the Impulse Source affects. Impulse Listeners in this zone react to the Impulse source (unless they are [filtered out](CinemachineImpulseFiltering.md)), while Listeners outside of it do not.
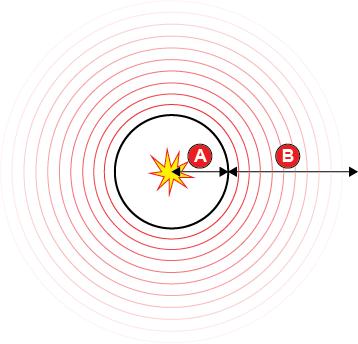
The zone consists of two parts: the **Impact Radius** and the **Dissipation Distance**. When the Impulse Source generates an impulse, the vibration signal stays at full strength until it reaches the end of the **Impact Radius**. Its strength then fades to zero over the **Dissipation Distance**. Together, these two properties define the signal’s total range.
In the image below, the vibration signal stays at full strength from the time it’s emitted from impact point until it reaches the Impact Radius (A), then fades out over the Dissipation Distance (B).

The **Dissipation Mode** property controls _how_ the signal fades out over the **Dissipation Distance**.
* **Exponential Decay** creates a fade-out that starts fast and slows down as it nears the end of the dissipation distance.
* **Soft Decay** creates a fade-out that starts slow, speeds up, and slows down again as it nears the end of the dissipation distance.
* **Linear Decay** creates an even fade-out over the dissipation distance.