# How to perform a full screen blit in Single Pass Instanced rendering in XR
The example on this page describes how to create a custom Renderer Feature that performs a full screen blit in Single Pass Instanced rendering in XR.
## Example overview
This example implements the following solution:
* A [custom Renderer Feature](https://docs.unity3d.com/Packages/com.unity.render-pipelines.universal@12.0/api/UnityEngine.Rendering.Universal.ScriptableRendererFeature.html) calls a custom [Render Pass](https://docs.unity3d.com/Packages/com.unity.render-pipelines.universal@12.0/api/UnityEngine.Rendering.Universal.ScriptableRenderPass.html).
* The [Render Pass](https://docs.unity3d.com/Packages/com.unity.render-pipelines.universal@12.0/api/UnityEngine.Rendering.Universal.ScriptableRenderPass.html) blits the Opaque Texture to the the [Camera color target](https://docs.unity3d.com/Packages/com.unity.render-pipelines.universal@7.0/api/UnityEngine.Rendering.Universal.ScriptableRenderer.html#UnityEngine_Rendering_Universal_ScriptableRenderer_cameraColorTarget) for the current renderer. The render pass uses the command buffer to draw a full screen mesh for both eyes.
The example includes [the shader](#shader) that performs the GPU side of the rendering. The shader samples the color buffer using XR sampler macros.
## Prerequisites
This example requires the following:
* The **Scriptable Render Pipeline Settings** property refers to a URP asset (**Project Settings** > **Graphics** > **Scriptable Render Pipeline Settings**).
## Create example Scene and GameObjects
To follow the steps in this example, create a new Scene with the following GameObjects:
1. Create a Cube. Ensure that the Cube is clearly visible from the main Camera.

Now you have the Scene necessary to follow the steps in this example.
## Example implementation
This section assumes that you created a Scene as described in section [Create example Scene and GameObjects](#example-objects).
Follow these steps to create a [custom Renderer Feature](https://docs.unity3d.com/Packages/com.unity.render-pipelines.universal@12.0/api/UnityEngine.Rendering.Universal.ScriptableRendererFeature.html) with a custom [Render Pass](https://docs.unity3d.com/Packages/com.unity.render-pipelines.universal@12.0/api/UnityEngine.Rendering.Universal.ScriptableRenderPass.html).
1. Create a new C# script. Call it `ColorBlitRendererFeature.cs`. This script implements the custom Renderer Feature.
```C#
using UnityEngine;
using UnityEngine.Rendering;
using UnityEngine.Rendering.Universal;
internal class ColorBlitRendererFeature : ScriptableRendererFeature
{
public Shader m_Shader;
public float m_Intensity;
Material m_Material;
ColorBlitPass m_RenderPass = null;
public override void AddRenderPasses(ScriptableRenderer renderer, ref RenderingData renderingData)
{
if (renderingData.cameraData.cameraType == CameraType.Game)
{
//Calling ConfigureInput with the ScriptableRenderPassInput.Color argument ensures that the opaque texture is available to the Render Pass
m_RenderPass.ConfigureInput(ScriptableRenderPassInput.Color);
m_RenderPass.SetTarget(renderer.cameraColorTarget, m_Intensity);
renderer.EnqueuePass(m_RenderPass);
}
}
public override void Create()
{
if (m_Shader != null)
m_Material = new Material(m_Shader);
m_RenderPass = new ColorBlitPass(m_Material);
}
protected override void Dispose(bool disposing)
{
CoreUtils.Destroy(m_Material);
}
}
```
2. Create a new C# script. Call it `ColorBlitPass.cs`. This script implements the custom Render Pass that performs the custom blit draw call.
This Render Pass uses the `cmd.DrawMesh` method to draw a full-screen quad and perform the blit operation.
> **NOTE:** Do not use the `cmd.Blit` method in URP XR projects because that method has compatibility issues with the URP XR integration. Using `cmd.Blit` might implicitly enable or disable XR shader keywords, which breaks XR SPI rendering.
```C#
using UnityEngine;
using UnityEngine.Rendering;
using UnityEngine.Rendering.Universal;
internal class ColorBlitPass : ScriptableRenderPass
{
ProfilingSampler m_ProfilingSampler = new ProfilingSampler("ColorBlit");
Material m_Material;
RenderTargetIdentifier m_CameraColorTarget;
float m_Intensity;
public ColorBlitPass(Material material)
{
m_Material = material;
renderPassEvent = RenderPassEvent.BeforeRenderingPostProcessing;
}
public void SetTarget(RenderTargetIdentifier colorHandle, float intensity)
{
m_CameraColorTarget = colorHandle;
m_Intensity = intensity;
}
public override void OnCameraSetup(CommandBuffer cmd, ref RenderingData renderingData)
{
ConfigureTarget(new RenderTargetIdentifier(m_CameraColorTarget, 0, CubemapFace.Unknown, -1));
}
public override void Execute(ScriptableRenderContext context, ref RenderingData renderingData)
{
var camera = renderingData.cameraData.camera;
if (camera.cameraType != CameraType.Game)
return;
if (m_Material == null)
return;
CommandBuffer cmd = CommandBufferPool.Get();
using (new ProfilingScope(cmd, m_ProfilingSampler))
{
m_Material.SetFloat("_Intensity", m_Intensity);
cmd.SetRenderTarget(new RenderTargetIdentifier(m_CameraColorTarget, 0, CubemapFace.Unknown, -1));
//The RenderingUtils.fullscreenMesh argument specifies that the mesh to draw is a quad.
cmd.DrawMesh(RenderingUtils.fullscreenMesh, Matrix4x4.identity, m_Material);
}
context.ExecuteCommandBuffer(cmd);
cmd.Clear();
CommandBufferPool.Release(cmd);
}
}
```
3. Create the shader that performs the blit operation. Call the shader file `ColorBlit.shader`. The vertex function outputs the full-screen quad position. The fragment function samples the color buffer and returns the `color * float4(0, _Intensity, 0, 1)` value to the render target.
```hlsl
Shader "ColorBlit"
{
SubShader
{
Tags { "RenderType"="Opaque" "RenderPipeline" = "UniversalPipeline"}
LOD 100
ZWrite Off Cull Off
Pass
{
Name "ColorBlitPass"
HLSLPROGRAM
#pragma vertex vert
#pragma fragment frag
#include "Packages/com.unity.render-pipelines.universal/ShaderLibrary/Core.hlsl"
struct Attributes
{
float4 positionHCS : POSITION;
float2 uv : TEXCOORD0;
UNITY_VERTEX_INPUT_INSTANCE_ID
};
struct Varyings
{
float4 positionCS : SV_POSITION;
float2 uv : TEXCOORD0;
UNITY_VERTEX_OUTPUT_STEREO
};
Varyings vert(Attributes input)
{
Varyings output;
UNITY_SETUP_INSTANCE_ID(input);
UNITY_INITIALIZE_VERTEX_OUTPUT_STEREO(output);
// Note: The pass is setup with a mesh already in clip
// space, that's why, it's enough to just output vertex
// positions
output.positionCS = float4(input.positionHCS.xyz, 1.0);
#if UNITY_UV_STARTS_AT_TOP
output.positionCS.y *= -1;
#endif
output.uv = input.uv;
return output;
}
TEXTURE2D_X(_CameraOpaqueTexture);
SAMPLER(sampler_CameraOpaqueTexture);
float _Intensity;
half4 frag (Varyings input) : SV_Target
{
UNITY_SETUP_STEREO_EYE_INDEX_POST_VERTEX(input);
float4 color = SAMPLE_TEXTURE2D_X(_CameraOpaqueTexture, sampler_CameraOpaqueTexture, input.uv);
return color * float4(0, _Intensity, 0, 1);
}
ENDHLSL
}
}
}
```
4. Add the `ColorBlitRendererFeature` to the Universal Renderer asset.
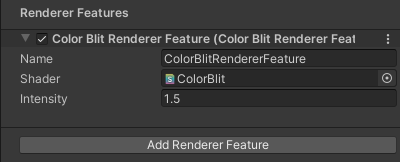
For information on how to add a Renderer Feature, see the page [How to add a Renderer Feature to a Renderer](../urp-renderer-feature-how-to-add.md).
For this example, set the Intensity property to 1.5.
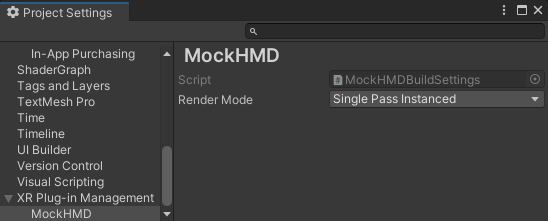
5. To visualize the example, configure the project to use XR SDK. [Add the MockHMD XR Plugin to the project](https://docs.unity3d.com/Packages/com.unity.xr.mock-hmd@latest/index.html). Set the **Render Mode** property to **Single Pass Instanced**.
Unity shows the following views:

6. Enter the Play mode. Unity shows the color buffer.

The example is complete.